Are you a blog creator?
If your answer is yes then this post is very useful for you. I will show in this post how to make the blog seo friendly by changing the basic settings of the blog. There are two types of blog settings, one is basic settings and the other is advanced settings. This article will show you how to change the basic settings of the blog very easily and correctly.
Follow the Below Step by Step Guide to Changes the Blogger Basic Settings
Basic settings are one of the most important parts of Blogger seo that will help your blog rank in search engines. Blogger is a platform that allows you to create blogs. Blogger is a great feature of Google that is perfect for creating free blogs. In order for a blog to rank in Google and other search engines, it is very important to have off-page seo with the on-page seo of the blog. Blogger Basic Settings is one of them. Blogger Basic settings include titles, descriptions, languages, and more. Its settings will make the blog professional and seo friendly. In this post, I will show you step by step on how to change Blogger Basic settings. Stay with us for how to make your blog professional by changing Blogspot Basic settings.
Title:
The title is a basic and important setting of the blog that attracts the viewers. This title is the original name of the blog which can be seen in the logo of the blog. With this title, anyone can know the blog. So a good title is very important.
When choosing a title you should try to use your domain name as the title. Which is the most accurate way? This can be said as a reason when a viewer likes the blog after reading your blog article and later when the viewer searches the title of the blog, he will not find the blog easily. So when you have a blog title, you should keep your domain name as the title. Or you can take whatever title you want as a domain name.

How to give title:
1. First, you go to Blogger then login to your blog account with email id. Then go to your Blogger's dashboard.
2. Click on the "Settings" option at the bottom of the Blogger Dashboard. A Blogger page will open in front of you.
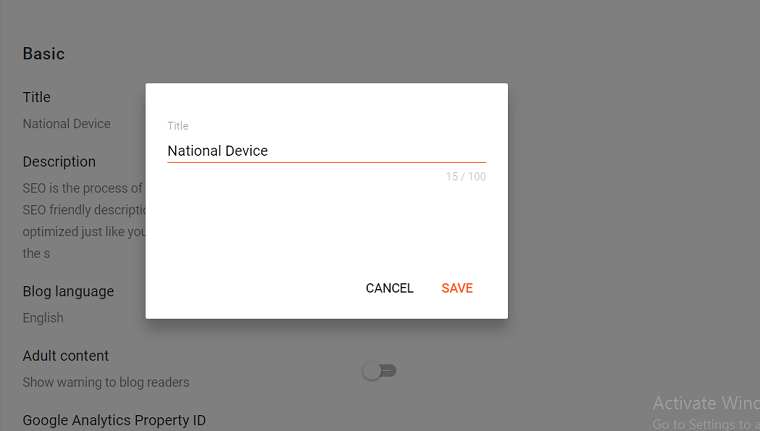
3. First of all, you will get the option of title, click on that option.
4. In the popup box that opens, type the title and then save it.
Description:
The description is one of the Blogger SEO settings. This description is called Blogger's original description. Of the Blogger Basic settings, this description setting is the most important. So these settings should be given the most importance. Which will help your blog to rank in search engines? This description should be given in 500 characters, that is, in about 80 to 100 words. Which will basically mark the topic of your blog? This description allows Google and other search engines to analyze blogs and blog topics. For all these reasons, a blog description needs to be given importance.
The correct rules for giving a description.
When giving a description, give the most searched keywords related to your blog topic. If your blog is tech-related then you will give tech-related keywords that are more searched. As a result, your blog will rank faster on keywords. You can give a description of 500 characters here.
Rules for giving descriptions:
1. First of all, you have to make sure that you are logged in to Blogger.
2. Then click on the Settings option in Blogger's Dashboard.
3. Click on the second option in the basic settings i.e. description.
4. Here you write a description of 500 characters, that is, about 70 words.
5. Then click on the save option.
In the blog language
Blog language basically confirms in which language your blog will be written. One of the great features of Blogger is the blog language. With the help of this blog language, you can create posts and blog sites in any language. There are all kinds of languages in the country, so you can create a blog in any language. For example, if you want to make it in English, select English. If you want to make it in Hindi then you select the Hindi option.
Rules for selecting a language
When selecting a language, keep in mind that your post will be created in the language you select. So if you want to make your post in that language, you select in that language. However, it is best to make this post in the English language.
Method of giving in language:
1. First of all, you open the blog and log in.
2. Then click on the Settings option in the dashboard and click on the language option in the basic settings.
3. Among the languages here, select the language in which you want to make the post. Then save.
Adult content
Adult content is an option that is not intended for general sites. This is mainly for blog sites that share adult images, videos, and posts. If you do not share this type of content, keep this option off. If you want to make your blog on such a topic then enable this option. However, in general, this option should not be enabled.
How to change adult content:
1. First, make sure you are logged in to Blogger.
2. Then you go to Blogger's dashboard and click on the Settings option.
3. If you want to enable the adult content option, then enable the option by clicking on the enable button next to that option.
Google Analytics Property ID
These settings are an interesting set of Blogger which will help you to analyze the blog and get all the information related to the blog view. With this Google Analytics, you will be able to know everything, such as how many people are currently opening your blog, which country the views of the blog are coming from. With this, you will be able to know how many views you have today and how those views came. So with the help of this option, you can easily get all the information about the performance of your blog. As a result, you can understand that your views can be increased. All in all, this option will help you to make your blog a success.
How to enable Google Analytics Property ID option:
1. To enable this option, first, you have to do a Google search for "Google Analytics" and click on the first option.
2. Then you log in with your email id and password. Remember that the email id you use here should be the email id of the blog, that is, the email you used to create the blog will be used here.
3. Then a page will open in front of you, where you will find a "Set for Free" button, click on it. Then a new page will open in front of you.
4. On this page, you need to give some information, first of all
"Account Name" Here you can enter any name. Then click on the "Next" option below. Then click on 'Next' again without making any changes on the next page.
5. On the next page, you first give the name of your website i.e. give the title. Then you enter the URL of your blog without using https. Then you choose your country below and click on the "Next" option. On the next page, you will find two-click buttons. Click on those two options and click on the "Accept" option.
6. Then you will be taken to a new page. Here you will find "Tracking id". Copy that tracking id completely then you go back to Blogger's dashboard.
7. Here you click on the "Google Analytics Property ID" option and then press the copied code. Then it will be saved.
After a while, Google will give you all kinds of information live. To get this information, go back to the "Google Analytics" site after a while, here you will find everything.
Favicon
The favicon option in Blogger will help to increase the quality of your blog. Favicon is a kind of logo that is basically on the top bar when opening a site. It is a small logo that will make your site professional.
When giving this favicon you will try to use your site's original logo as favicon. You can also make a favicon for free. That's why if you search on Google, you will find many sites that will make you a free favicon. Below are the links to some of the sites that make a favicon for free. Remember that your favicon should not be more than 100 kb in size.
How to add to Favicon blog:
1. First, you download a free favicon. Then you click on the Settings option in Blogger's dashboard and then click on the favicon option.
2. Then select your downloaded file and click "OK". After a while, your favicon will be associated with your blog.
Let us know what you think of this article by commenting and if you like the post, subscribe to our site.


